How To Take Star Trails Pictures
Emeritus Professor of Astronomy
Minnesota State University, Mankato
You will need the following:
- a camera which has a shutter with a B or Bulb setting
- a locking cable release
- a tripod or other support for the camera
- a clear night
- a dark sky, free from streetlights, car headlights, and moonlight
You may also wish to bring these:
- a watch for timing exposures
- a notebook and a pen for recording settings
- a flashlight to see what you are recording
- warm clothing or mosquito repellent, depending on the season
What to do:
- Load your camera with film. Use color film for best results -- stars are colored. Slides are better than prints, as most automatic processors will not print dark pictures. Any speed can be used; ambient lighting will be held in check better by slow film, but fainter objects can be recorded with faster film. A smaller diameter lens requires faster film to record the fainter stars.
- Set the camera on the tripod and point it at a group of bright stars.
- Set the aperture wide open -- to the lowest f number, usually about f/1.4 or f/1.8 for a 50 mm lens. If ambient lighting is strong, stop the lens down to f/2.8 or so.
- Set the focus to infinity.
- Set the shutter speed to B. This means the shutter will remain open as long as the button is pressed down. --- [Caution! If your camera has a meter that shows you LED lights in the viewfinder when you depress the shutter slightly, you will want to check to see whether those lights stay on or go off when you make an exposure. If they go off, there is no problem. If they stay on, you may get some stray light on your film during long exposures; in that case you should either turn off the meter (if possible), unscrew the battery compartment until the meter stops working, or remove the batteries altogether.]
- Install the locking cable release on the shutter release button -- on most cameras it simply screws in. (Be sure you have practiced using this gadget before -- it's too late now.)
- Cock the shutter and check the viewer for proper aiming. Don't expect to see very much through the viewer. If you don't see anything, take off the lens cap.
- Push the cable release button and lock it down. You should hear the shutter click open. Note the starting time.
- Wait patiently for some length of time. If skies are dark, wait up to several hours. If in town, try five minutes. Experiment with exposure times to get the desired effect. If you stroll around in the dark while you wait, be careful not to trip over the tripod. Do not bring a large clumsy dog or a small active child.
- Unlock the cable release; hopefully you will hear the shutter click shut. If not, your cable release did not lock or your shutter was not set on B.
- Record the date, time, location, film speed, lens, aperture, exposure time, direction of target, and its name (if you know your constellations). Then find a new target and do it all again.
Developing your film:
When you have finished a roll, be careful in getting your film developed. Some developers will note your dark pictures with dots or streaks and assume you are just another photographic loser. They may damage or destroy your entire night's work. Before turning in a whole roll of star trails, you should try one or two shots on a roll of regular pictures to see what the developer's response will be. (I still do this anyway -- 24 star trails require a lot of effort.)
When you get your pictures back, record on each slide (or on the back of each print) the date, film speed, lens, etc., and as your collection grows, you'll have the pertinent information along with each picture.
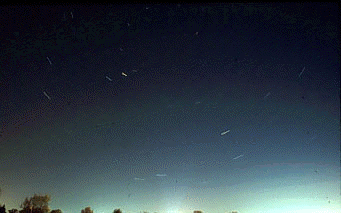
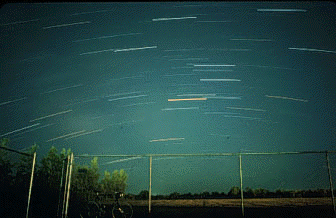
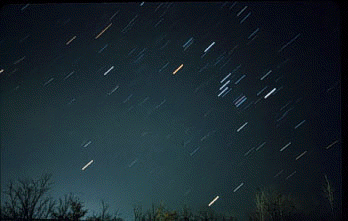
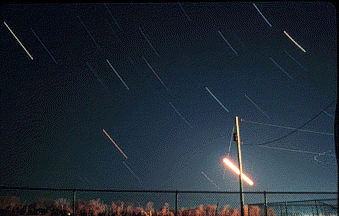
Examples of star trails:

Looking north from Mankato, MN; 10/28/97; ISO 400, 28mm f/8, 15m

Looking south from Standeford Observatory; 6/12/82; ISO 400, 28mm f/3.5, 36m

Looking east from Standeford Observatory; 11/4/83; ISO 400, 28mm f/3.5, 10m

Looking west from Standeford Observatory; 4/5/84; ISO 400, 28mm f/8, 30m
Back to Dr. James Pierce's home page.
Created October 10, 1997; last modified March 19, 2021
Send comments or suggestions to
James Pierce - james.pierce@mnsu.edu


