
Sheila's Round Chair.
Sheila took on a Round Seated Chair for her first project. This is quite a
challenge, but she was successful. The following is her story, illustrated email
& pictures.
Friday, January 31, 2003 11:52 AM
To: Sharp, Wayne
I recently inherited a small chair my Grandfather made. It had a wood seat screwed on but there are caning holes. Also it is round. I have never attempted to cane anything but would like to tackle this project. I measured the holes and the distance between and assessed the size cane to be fine fine so I purchased a kit. After reading the instructions I am still confused as to where to start the cane. Do I start in the middle of the front or to the side? Also should I stain the cane to match the chair before or after completion? On a round chair will the weave be a lot different than on a square. Thank you, Sheila
To: Sheila,
Round seats are a challenge, especially for a first caning project. A round cane
seat chair will "logically" weave the same as a square seat chair. However the
round seat will have more "fish-eyes", were horizontal & vertical cane pairs use
the same hole.
Where to start? Think of the round seat as square. It might help you to use a piece of cardboard in a square shape to keep you thinking this way. Lay over the round seat & mark corners with a pencil. Now treat your round seat as a square seat. Find the center-most hole in the back & also match it with the center-most hole in the front. Peg these holes. While your at it, you might as well find center holes on each side & peg.
Now, you must keep the cane running straight to your eye, for both horizontal & vertical runs. This will be important as you follow the curve of the seat. Also keep the width between the parallel cane runs equal. You may skip a hole to keep the cane width the same.
Now follow the 7-step caning instructions you can find on my website.
I personally prefer the natural look of cane, so I don't stain or paint my cane. However, if you want to stain it, do that after you've completed caning. Good Luck with your project. Wayne.
This picture shows that Sheila started by finding the center holes in the top, bottom & both sides. She also found the "corners" & marked them with golf tees. The "corners" will be were she will need to "fisheye" to double up on some holes.
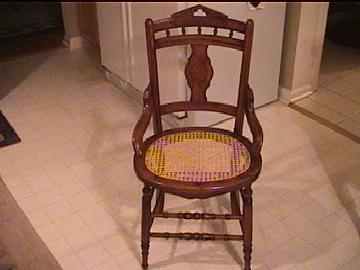
The following two pictures show her completed project.
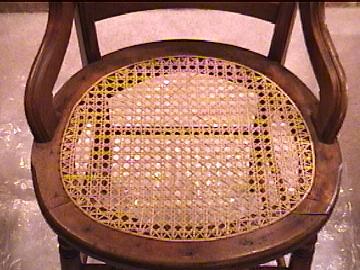
A round seat will have multiple "fisheyes" in each corner. These are needed to keep the cane straight & running to the edges.
To: Wayne, Feb 6, 2003
I wanted you to see the end results of my project. I know I have a few mistakes
and the bottom does not look as neat as I would have liked due to the use of
many pieces of cane resulting in many tie offs. Maybe some hints on the tie off
process would be helpful on your site. I found the cane dried out before I could
tie off sometimes and made it difficult. I do agree a square chair would have
been much simpler to start with, but it was a lot of fun anyway. Your site was
very helpful and I am so glad you put it out there for people. Thank You so
much. As you can see from the pictures I decided not to stain but I did put tung
oil on the finished piece. Sheila
Great job, Sheila! Thank you for sharing your successful completion.
Wayne