Chair Caning Instructions: Basic Chair Design.
This project was commissioned by a grandmother, who wanted HER Grandmother's chairs returned to their original beauty. She had a neighbor refinish them, before bringing them to me for caning. This gave me opportunity to refresh my 7 Step Caning Instructions, while looking to see how efficient I could be. Think of this as a supplement or update to my original instructions completed about 6 years earlier.
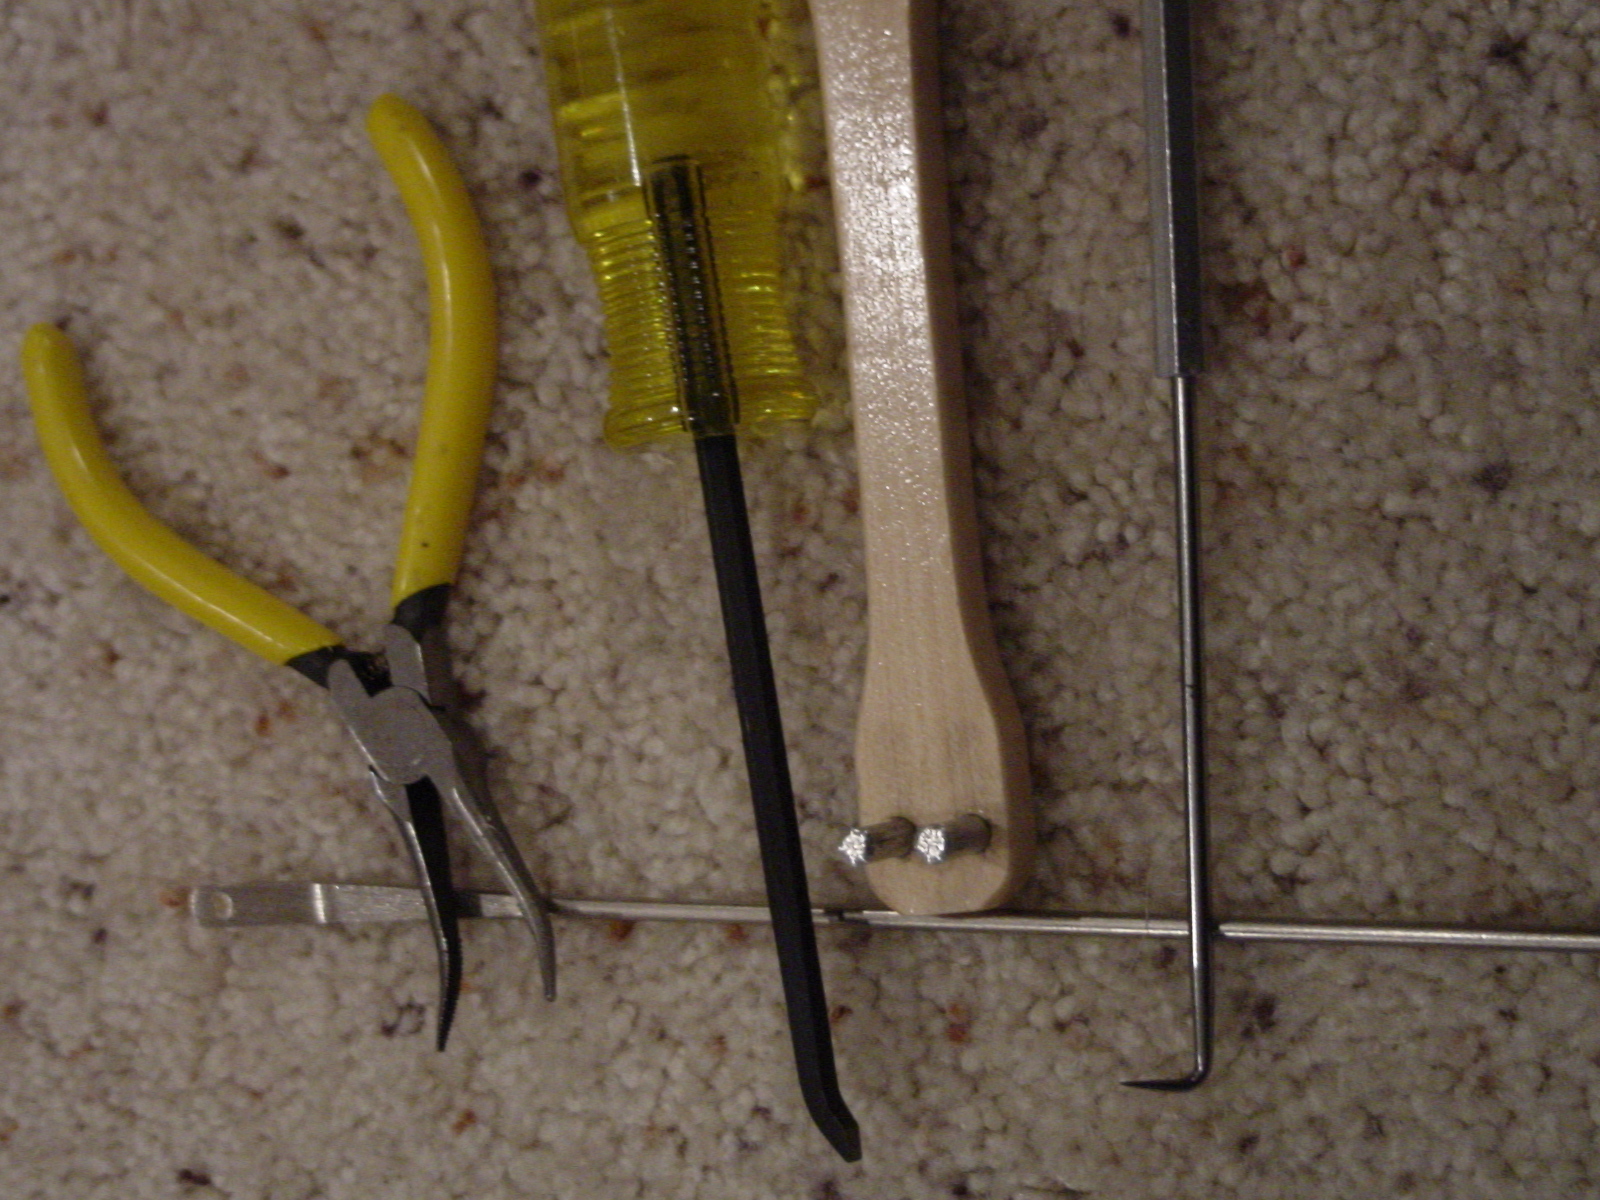
Tools.
Here are some additional tools that I have accumulated. They are all optional,
as some work for me & some don't work so well for me. In order, from left
to right: 1. curved spring loaded needle nose pliers - great for those hard to
reach spots. 2. Pressed cane groove cleaner - haven't had the opportunity to try
yet, but I know the damage I did with a regular screw driver, so hope to avoid
that on the next pressed-cane project. 3. Cane Straightener - this works well to help align
cane after step 4 weaving. 4. Dental Pick - with 90 degree bend. This helps to
lift the cane, opening up just enough space to run a cane strand underneath.
5. Cane Needle (laying horizontal) - I find this of little help. I have tried
it on step 4 weaving & am still learning to use it. However I have cut
existing cane & had to replace, so use with caution.
Sizing Cane
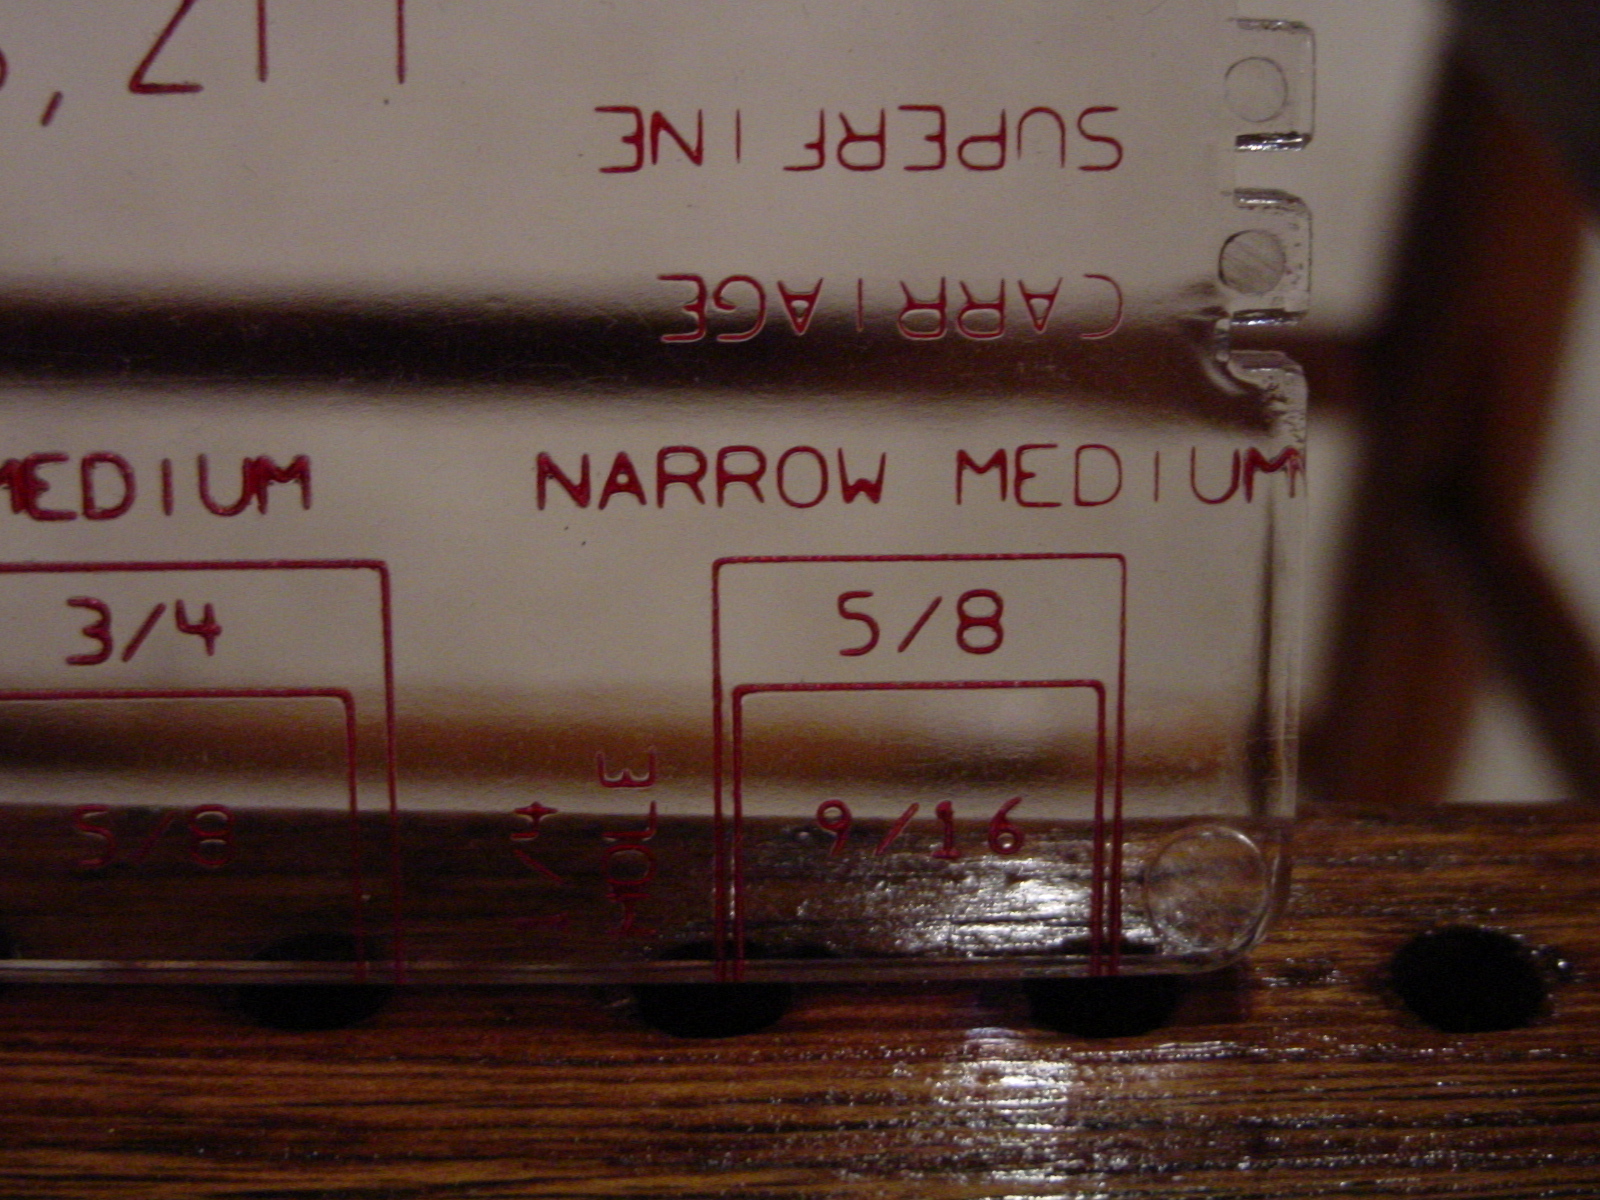
Another new tool.
This tool will help determine hole size & spacing between holes,
which then tells you the size of cane to use. It will also identify the
size of the cane used in an existing seat. I found that even with
this tool, you have to make some choices. It seems that many chairs do
not holes exactly sized & spaced to match a specific cane
size. You must chose which measurement most closely fits your
chair hole design & which cane you think will look the best. I seem
to choose cane size based more to match hole spacing 1st & hole
size 2nd. These pictures show: measuring the hole size &
distance between holes. As always, a good rule of thumb is to
take a piece of cane along to match when you purchase the replacement
cane.
.
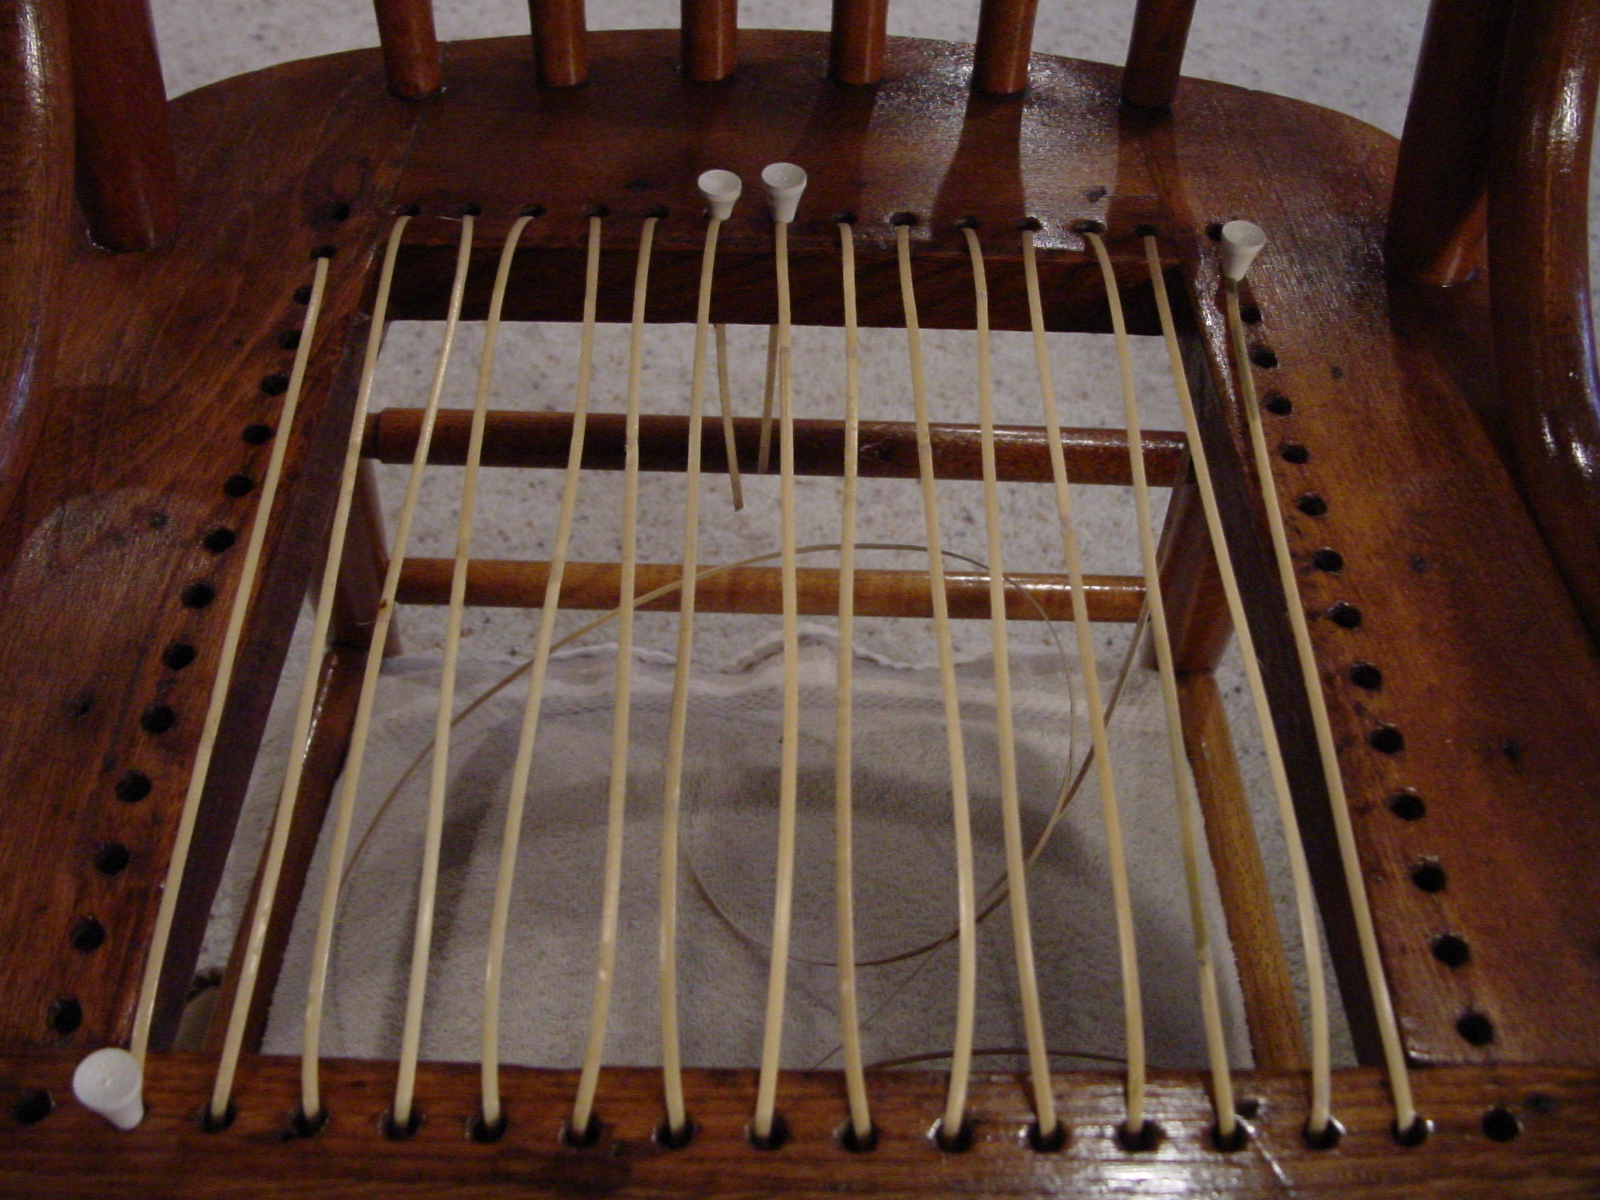
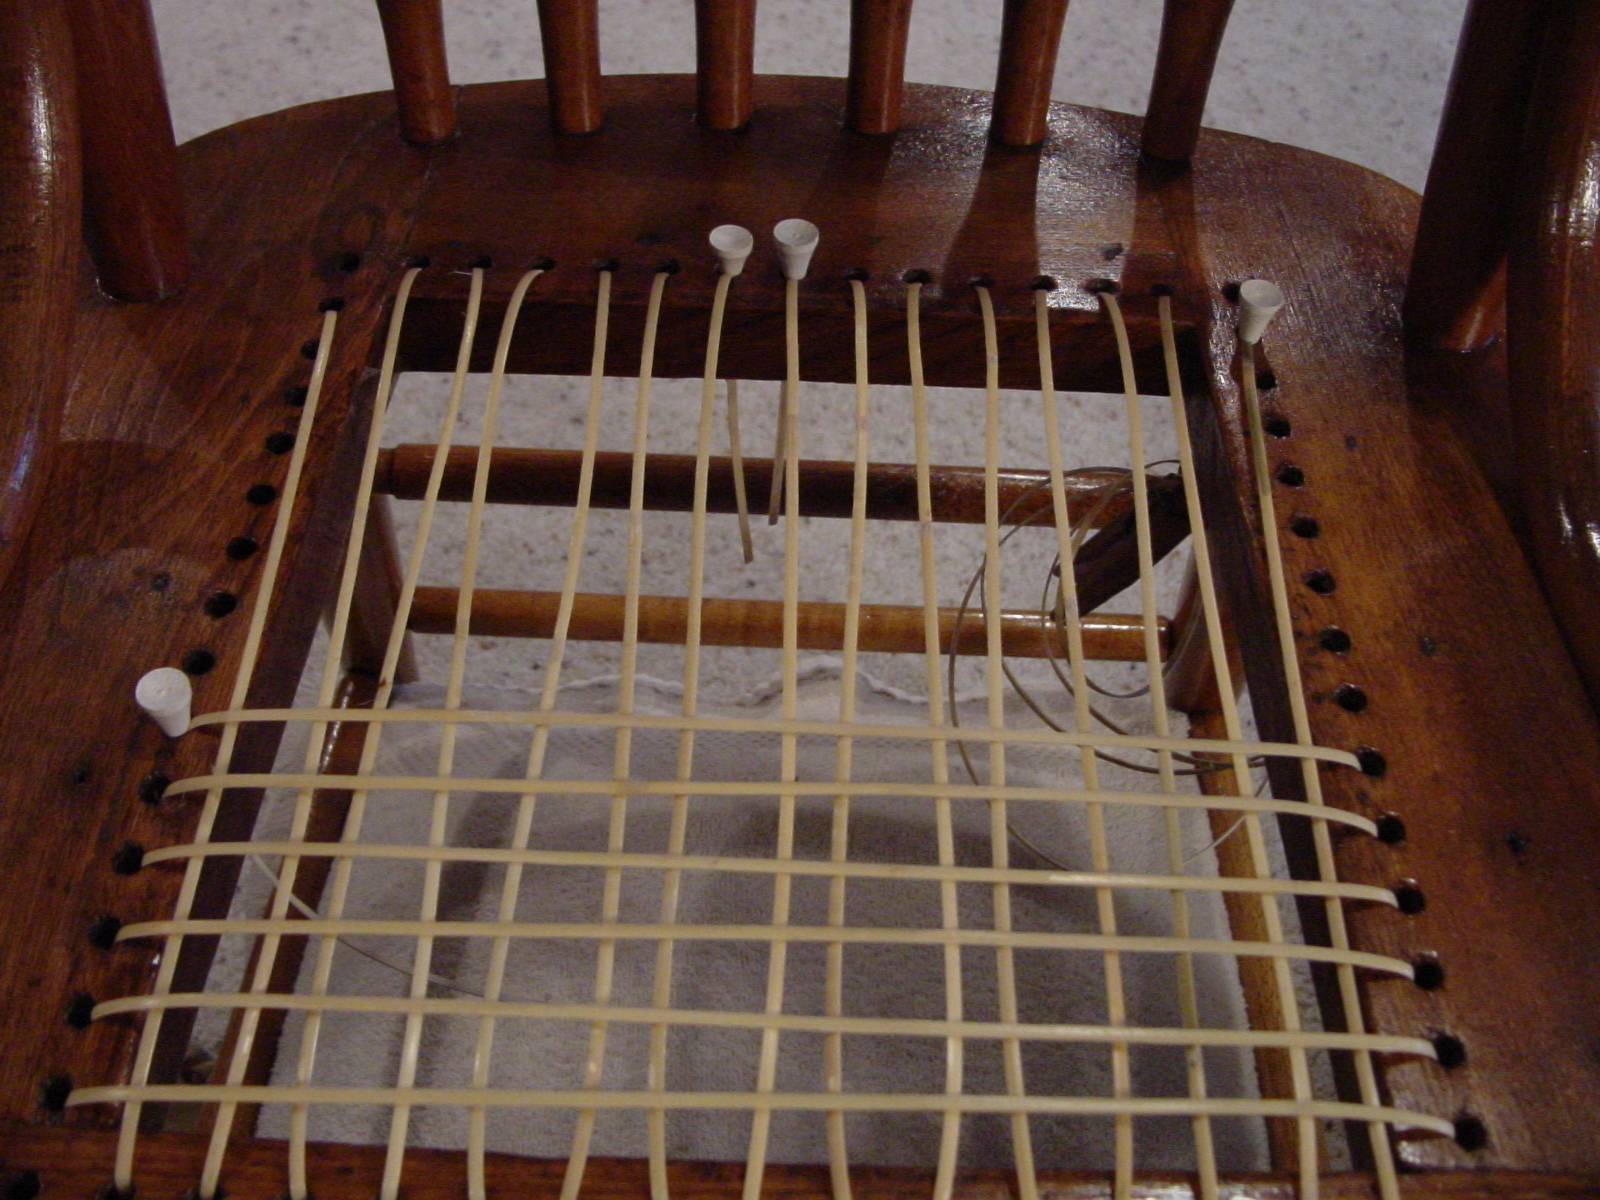
Step 1. First Vertical
Start by soaking several cane in warm water for 15-20 minutes. Add
a capful or two of Glycerin in the water to help the cane maintain it's
flexibility & slide through tight places. Use the longest
possible cane strands on these first three steps to help minimize
knots. The first three caning steps will go quickly & use at
least 6 cane strands. It takes me about 1-1.5 hours to complete the
first 3 caning steps.
Notice that the front rail has more holes than the back rail, forcing the need
to use a side hole. Keep the vertical runs parallel looking. This is an
indication of where a "fish-eye" will form.
Do not worry about keeping the cane tight. Leave it loose enough so that when
pressed down it will reach the bottom side of the rail (about 1/2").
The cane will naturally tighten up as the weaving steps continue. If you make
the cane too tight now, you will increase your difficulty of weaving later. Do
not tie-off until after step 4.
Step 2. First Horizontal
Run the first horizontal on top of the Step 1 first verticals. Efficiency
tip: Because I had a long cane strand left over from step 1, I used it to start
the horizontals, instead of tying off & starting a new strand.

Step 3. Second Vertical
Run the Second Vertical over the top of, & to the right of, the Step 1 first
vertical. On the side rails, use the same holes as in Step 1.
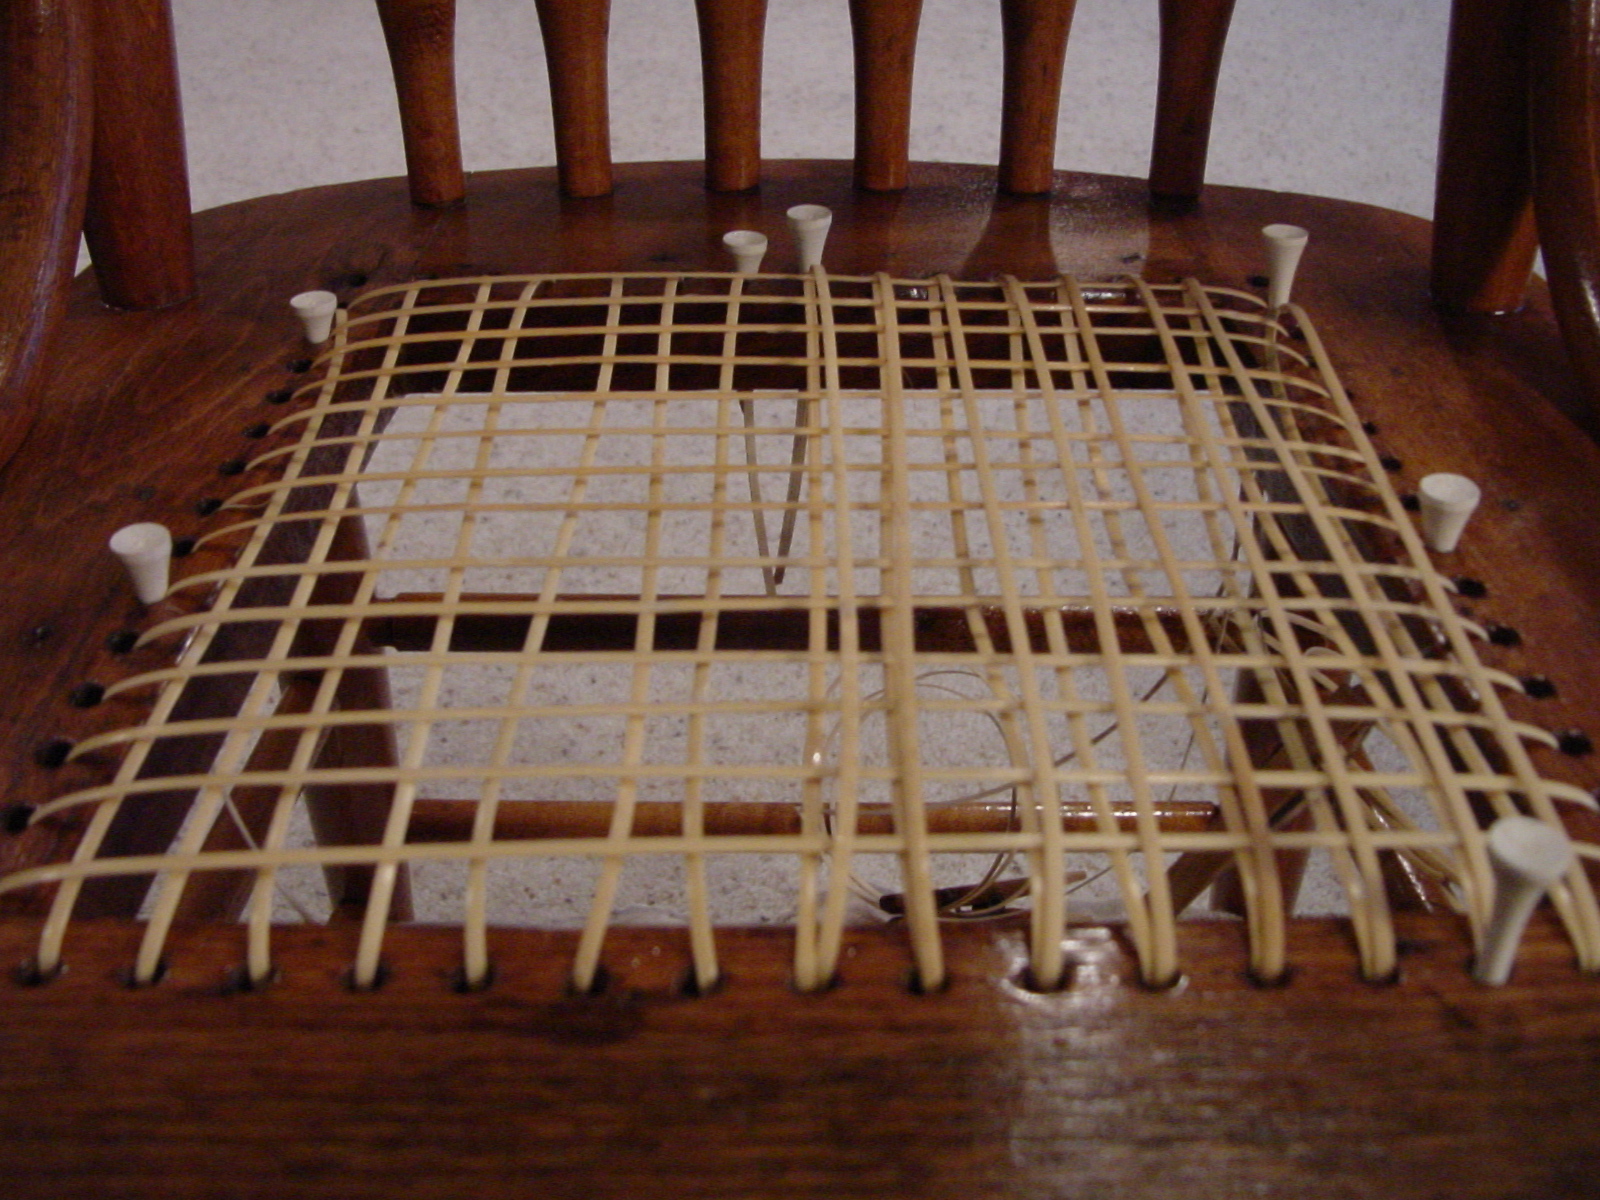
Step 4. Second Horizontal. Weaving begins here.
This step takes me the longest time to complete. I probably spent 2 hours on
just this step. Run the cane below Step 2 first horizontal canes. Weave the cane
OVER the Step 3 vertical & UNDER the Step 1 vertical. Use extra care to
keep the canes lined up vertically & horizontally. Stop after each run &
re-align the cane. A caning needle may help speed up this step, however be
careful in tight spaces to not cut existing canes.
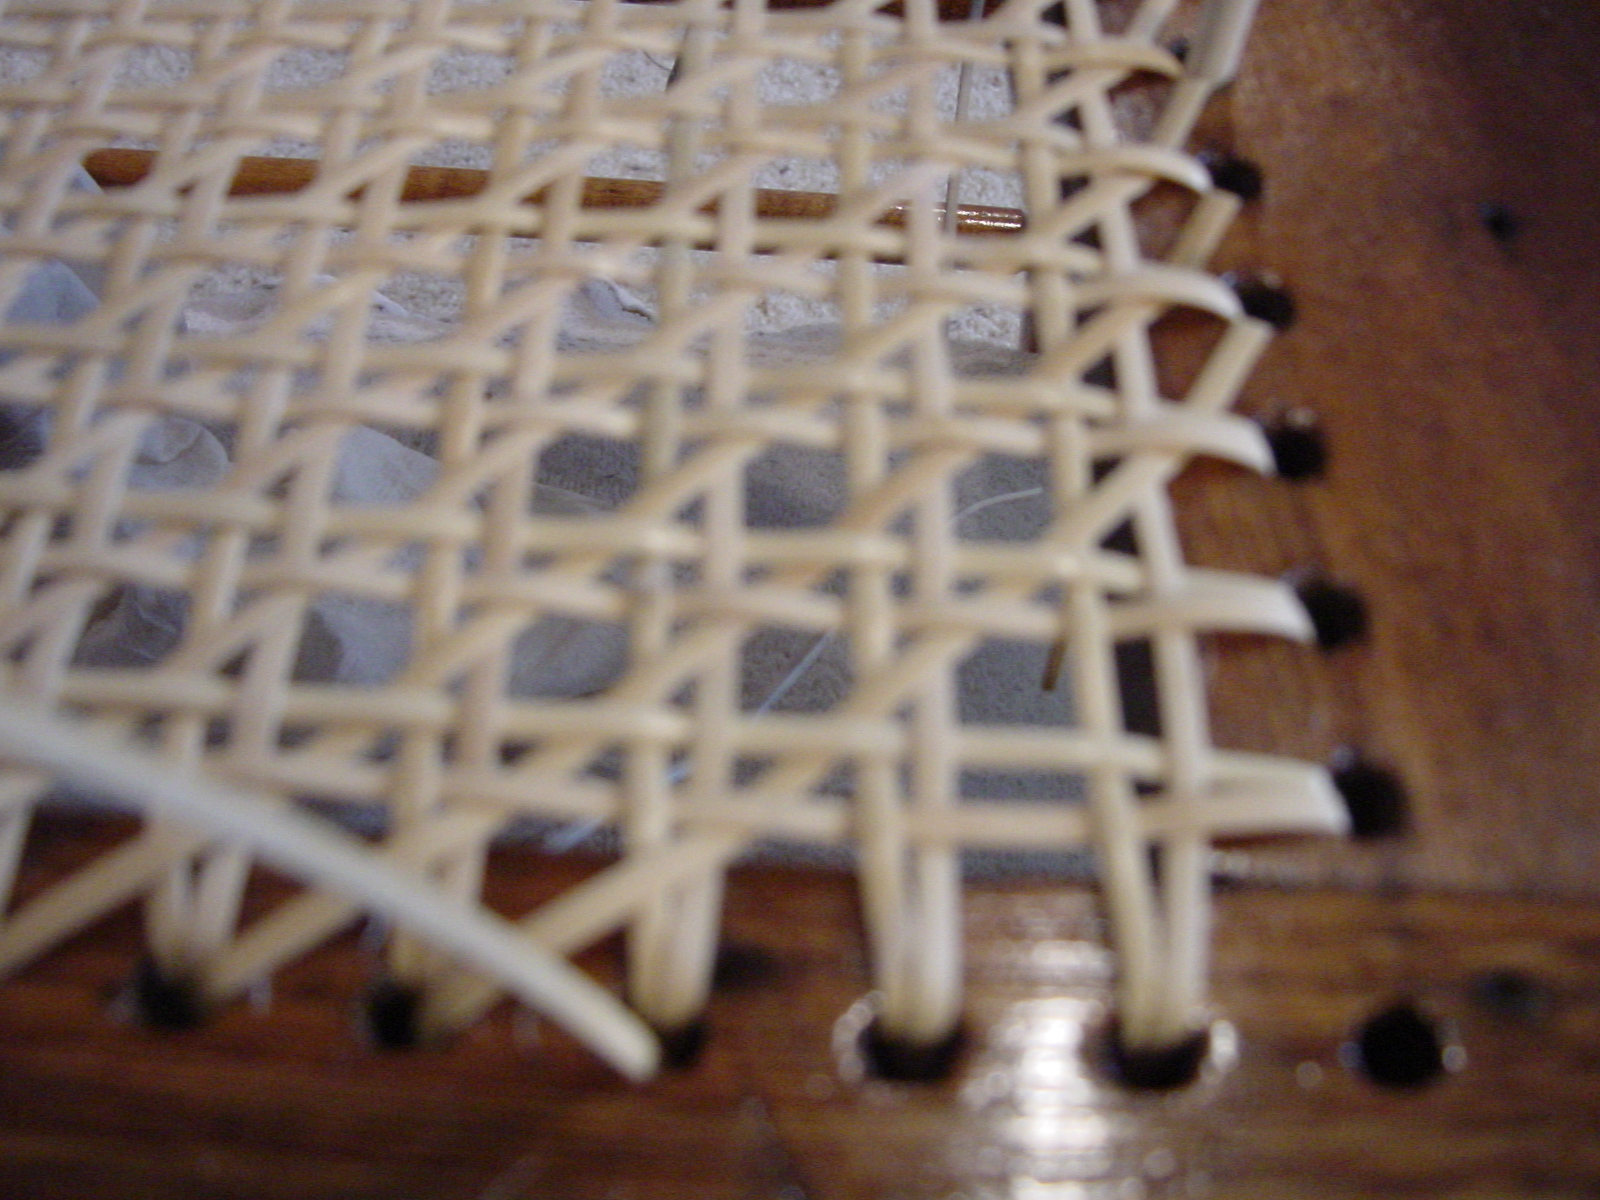
After step 4 is completed, use the aligning tool to straighten each intersection of cane pairs. This is a tremendous help in preparation for the diagonal runs in Steps 5 & 6. Using two golf tees or wood pegs to line up the cane pairs works also.
Tie off the ends now beneath the seat. You may have to wet the cane ends with a damp cloth, to regain flexibility. Loop the cane end twice under the cane & cut the end leaving about 1/4".
If you stop between steps, lay a warm damp cloth or towel on the caned
seat while you soak your next cane strands. This helps to regain flexibility in
the seat cane & makes it easier to work.
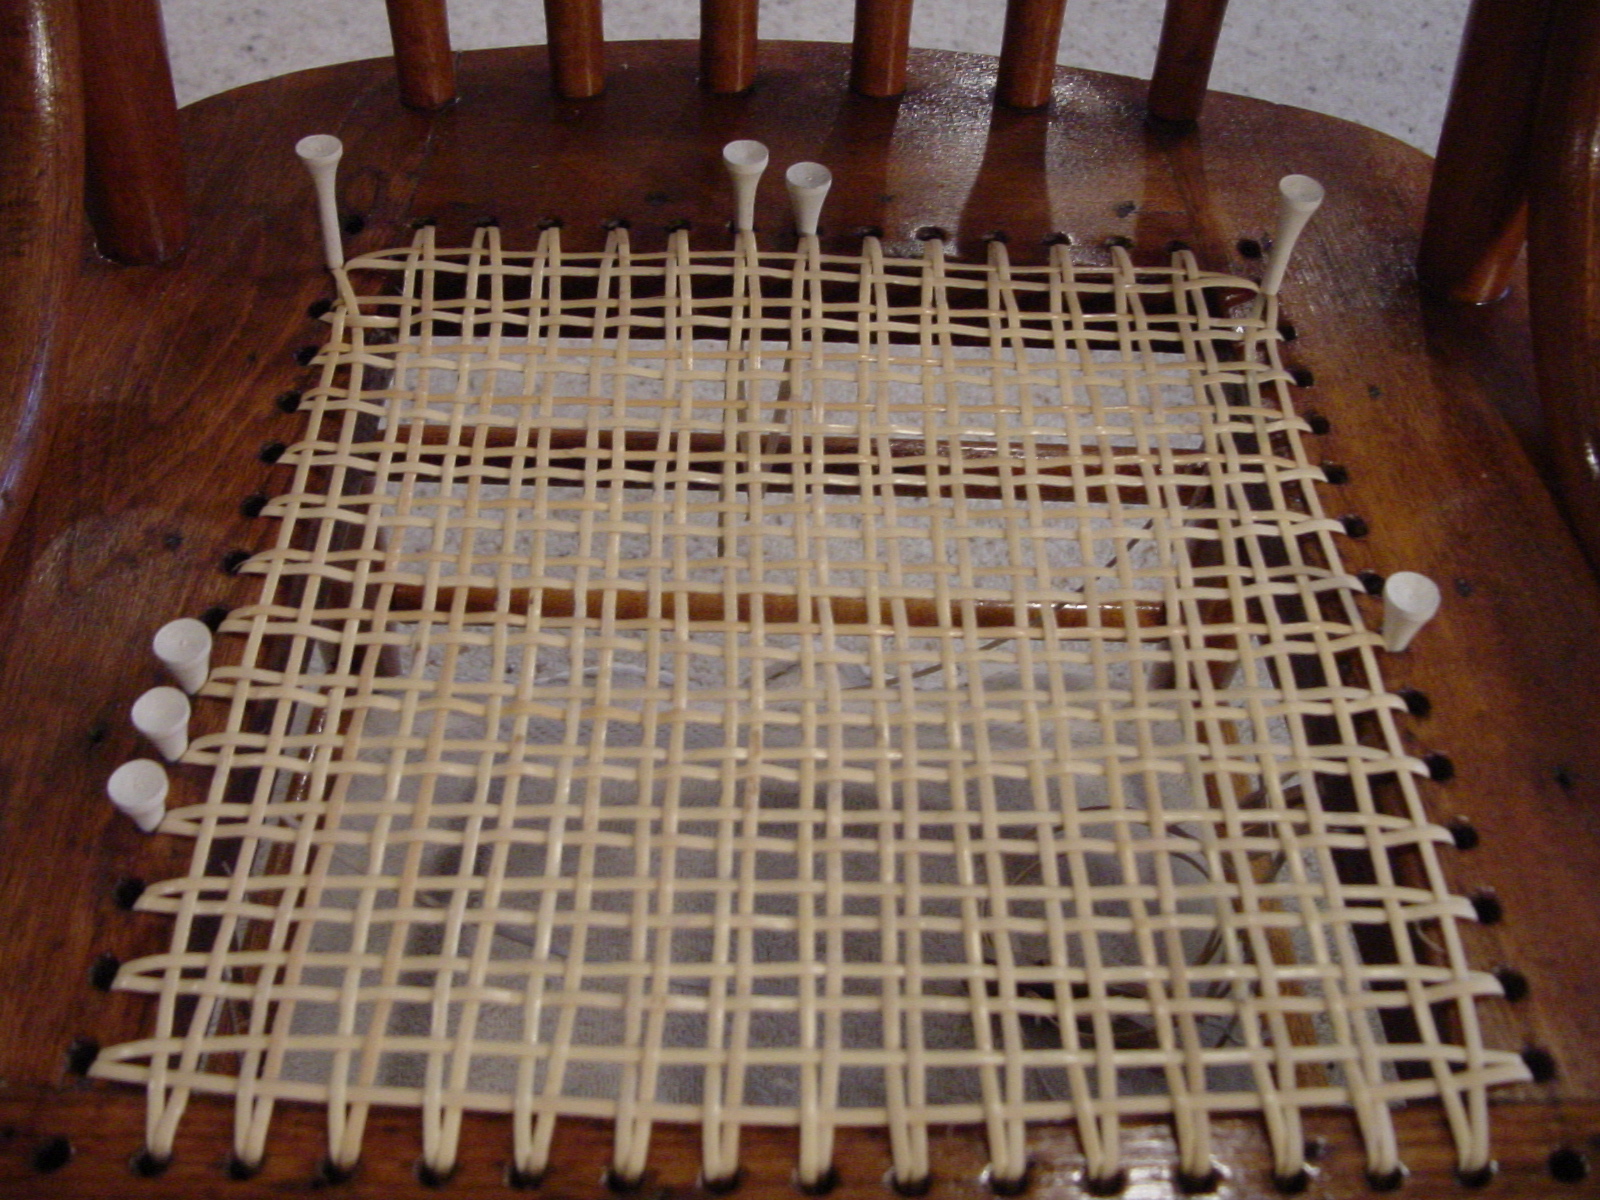
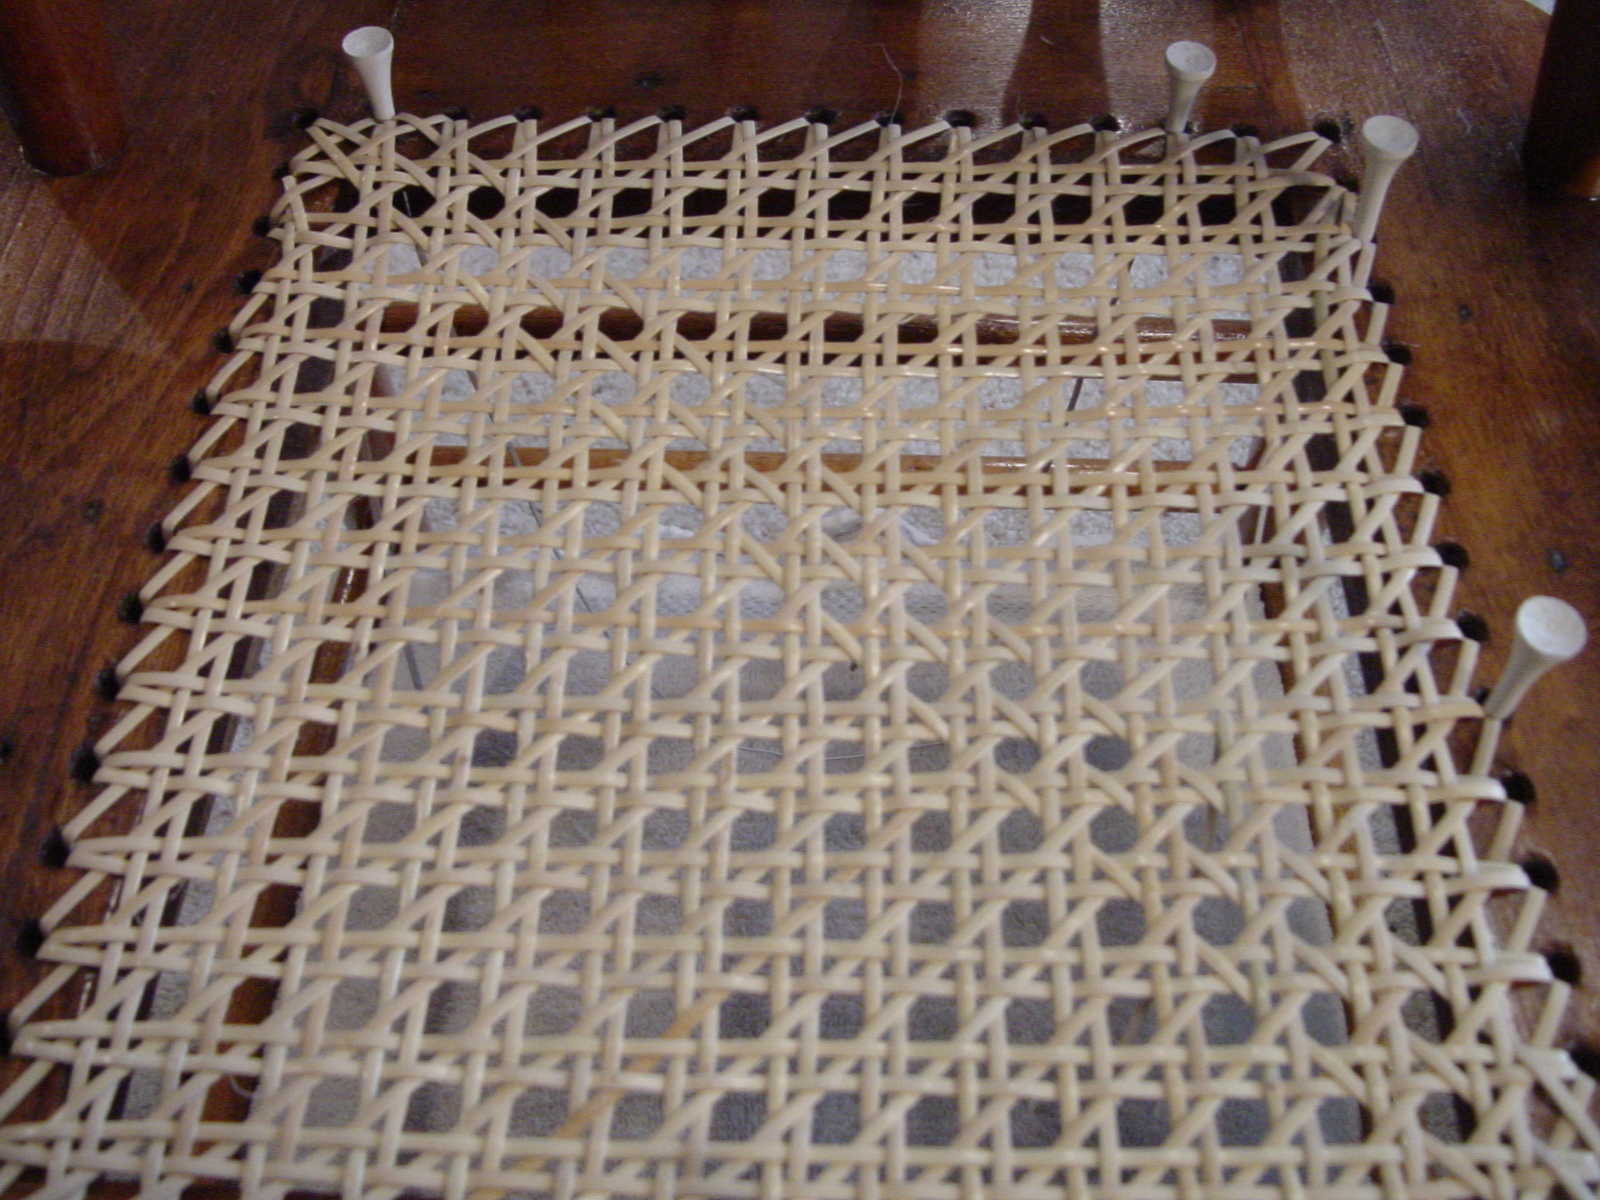
Step 5. First Diagonal
The canes are now run diagonally from front to back. You can start from either
corner actually, though some professionals preferred one way or the other (Left
Back towards Right Front VS Right Back towards Left Front). Because I had left
over cane ends at the back right corner, I started there. If unsure how to
start, take a small length of cane & run a practice cane from back towards
front. This will help to visualize how the cane should run. If you have
difficulty pulling the cane through, STOP & check to make sure your running it
correctly. If the cane is cutting or splitting, you may be running it
incorrectly (against the grain).
Weave OVER the Vertical pairs & UNDER the Horizontal pairs. Notice that the cane fits snuggly into a natural slot created from the intersection of the Vertical & Horizontal canes. If the cane is not fitting into this slot, it may cut the cane. Pull the cane tight as you weave now. This will tighten up all of the seat.
Forming the "X" takes place on the diagonals. Take extra care to run
the cane to that furthest hole on the rail, pulling the vertical or
horizontal pairs tighter together. The "X" is formed on the rail when
the cane is run to cover the verticals or horizontals on the rails. The
"X" makes the caned seat somewhat stronger & more attractive, while
keep the pair of verticals or horizontals from seperating over time.
The first leg of the "X" is created in step 5 & the second leg
comes from step 6.

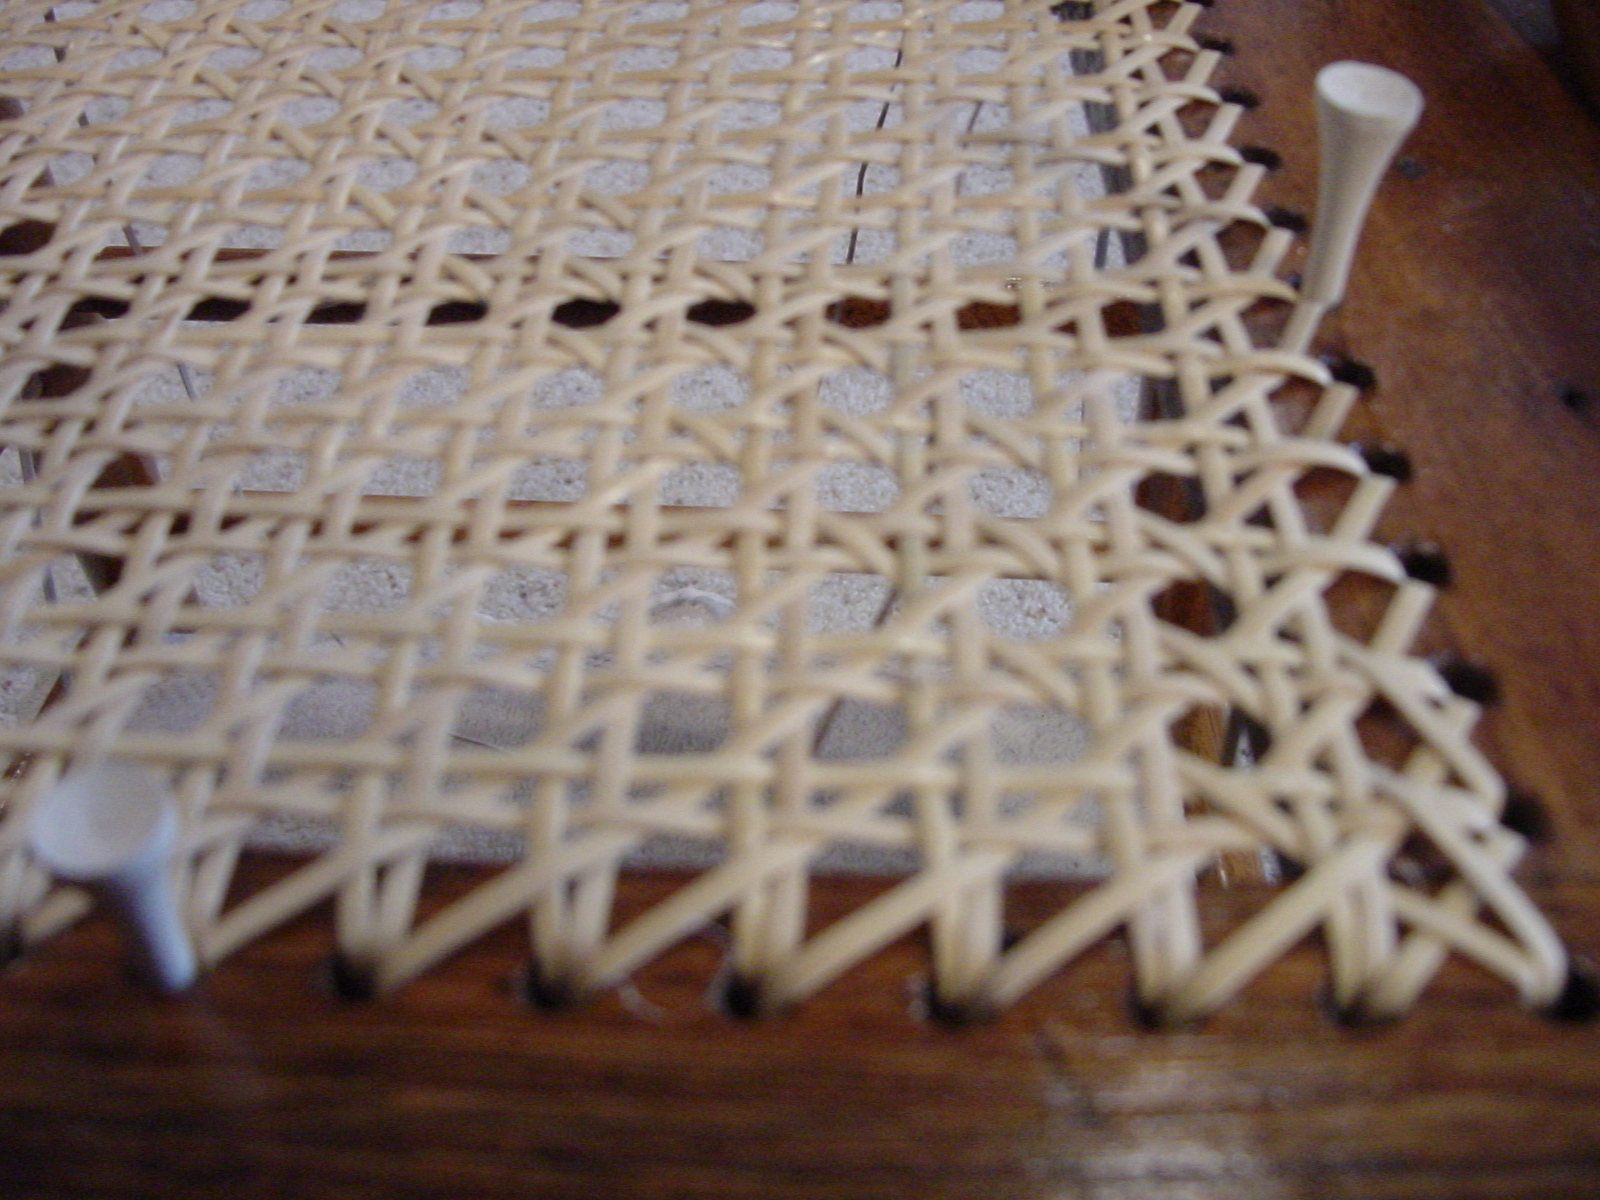
Step 6. Second Diagonal
Weave UNDER the Vertical pairs & OVER the Horizontal pairs. Again, notice that
the cane fits snuggly into a natural slot created from the intersection of the
Vertical & Horizontal canes. If the cane is not fitting into this slot, it may
cut the cane. The second leg of the "X" is formed here. Take the extra effort to
look for it & complete it, even if you have to stretch to the next hole or weave
under some tight intersections.
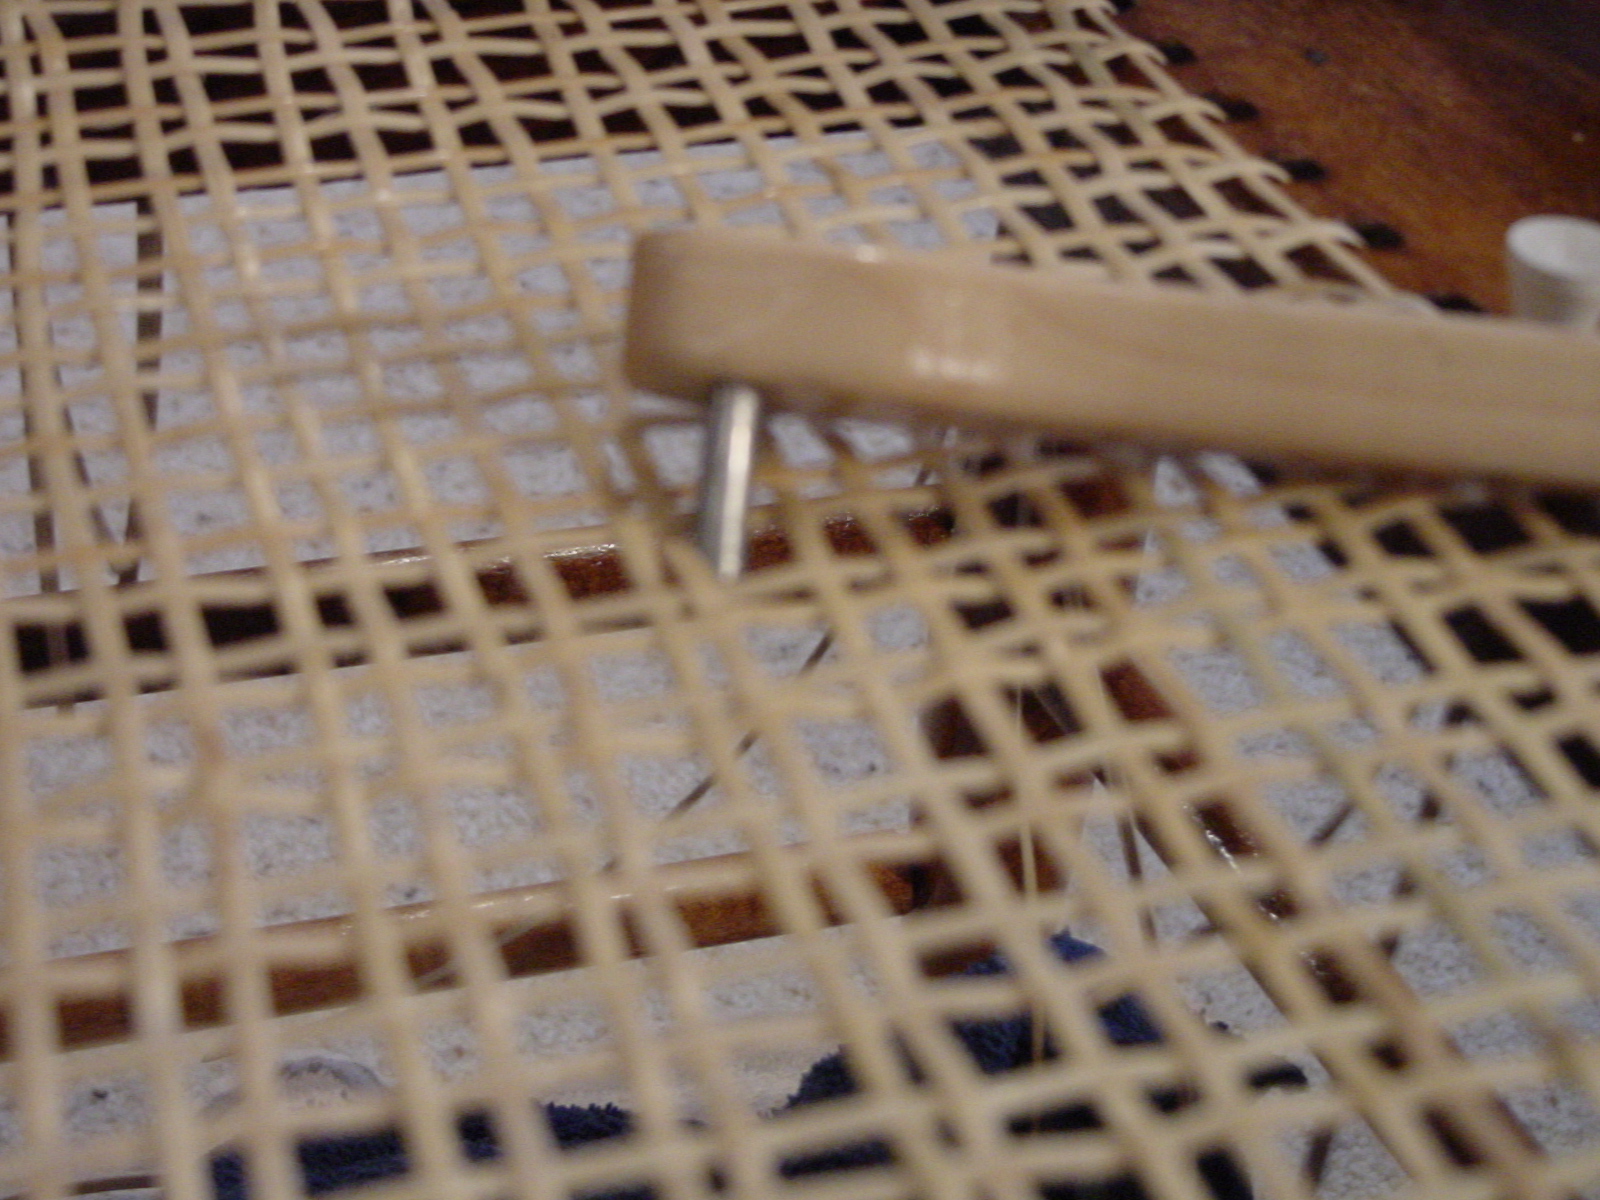
Step 7. Border
The border finished the seat. Use a wide border cane (at least 1
size larger than the cane used in the seat) to lay flat on the seat
covering the holes. Use same sized cane as used in the seat to loop
over the border to hold in place. The ends of the border cane can be
run from one corner hole to the next corner hole. On square seats the
border cane ends can be simply "pegged" or "couched" to secure them.
To Peg the border ends, simply form a small dowel to fit into the hole & force it into position.
The picture below shows the "couching" corners. This is where one
border cane end is run down the corner hole. The second border cane is
placed in the hole over a small dowel point. Then together the border
cane & dowel are forced down the hole to hold the ends,
forming a neat 90 degree corner. Couching the corners is now my
preferred technique, as I think it looks more professional.
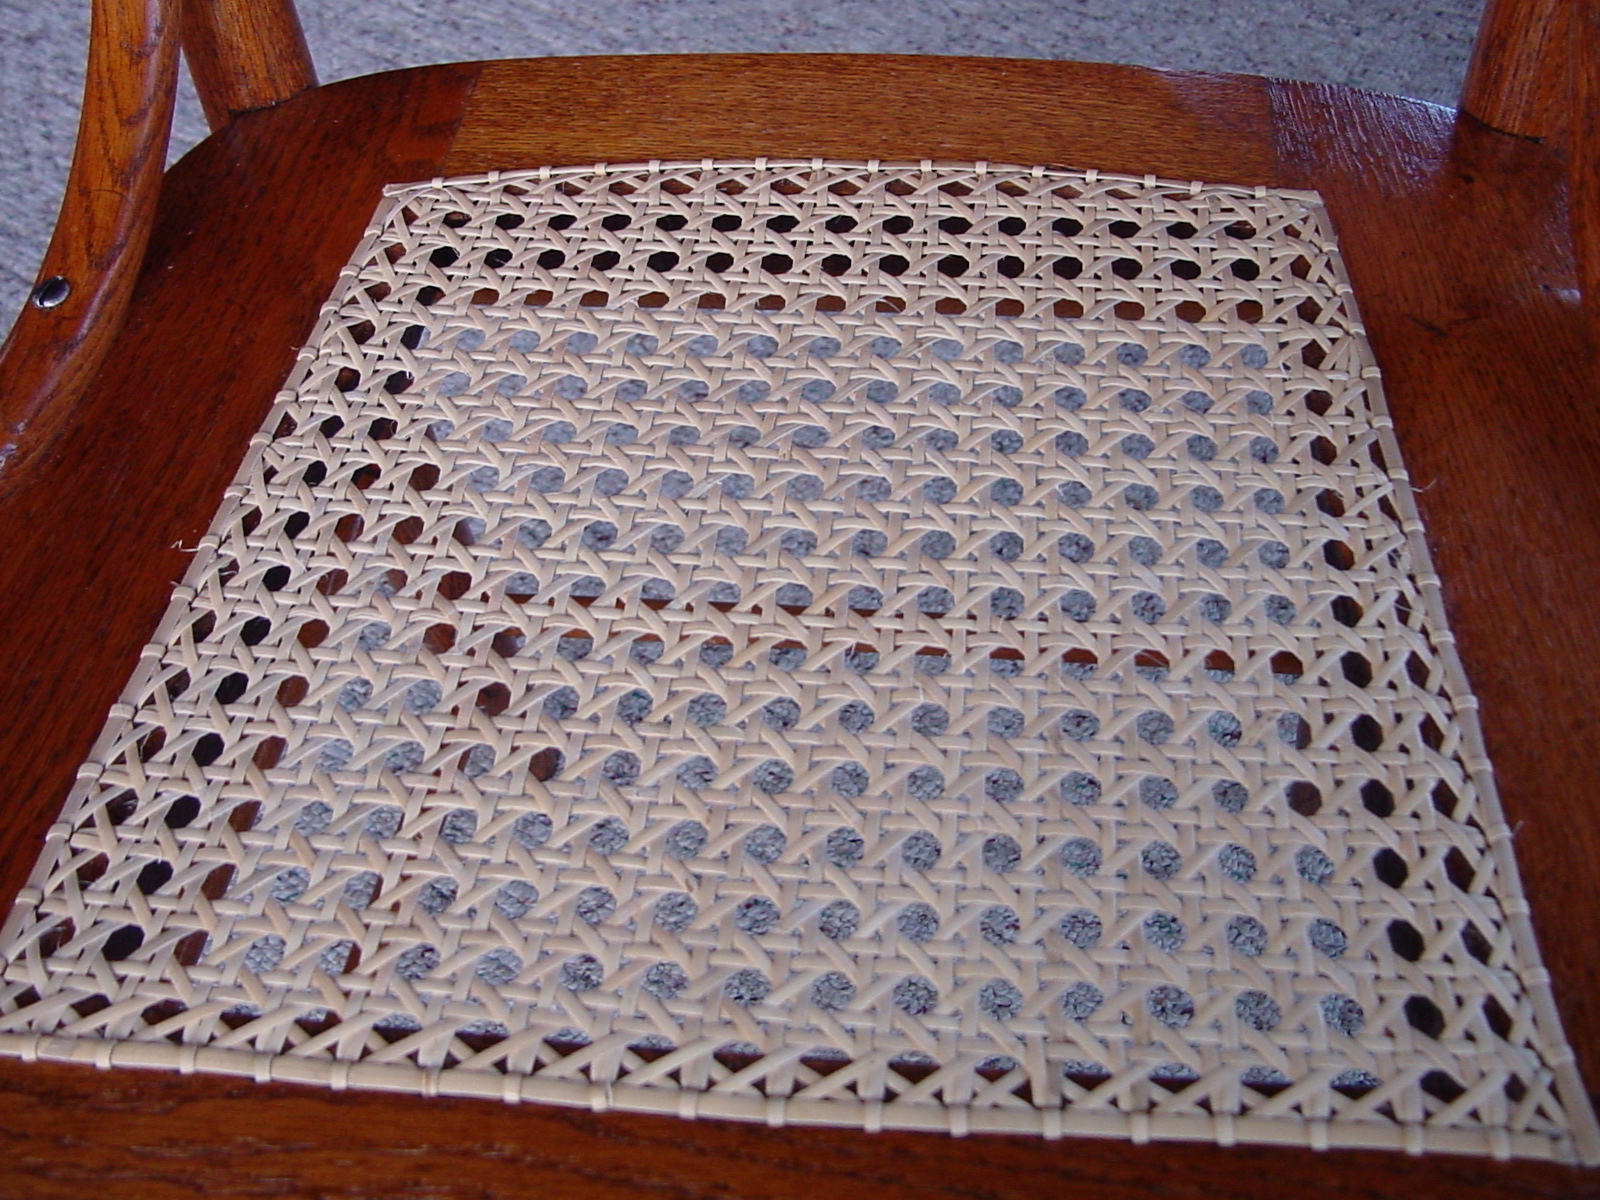
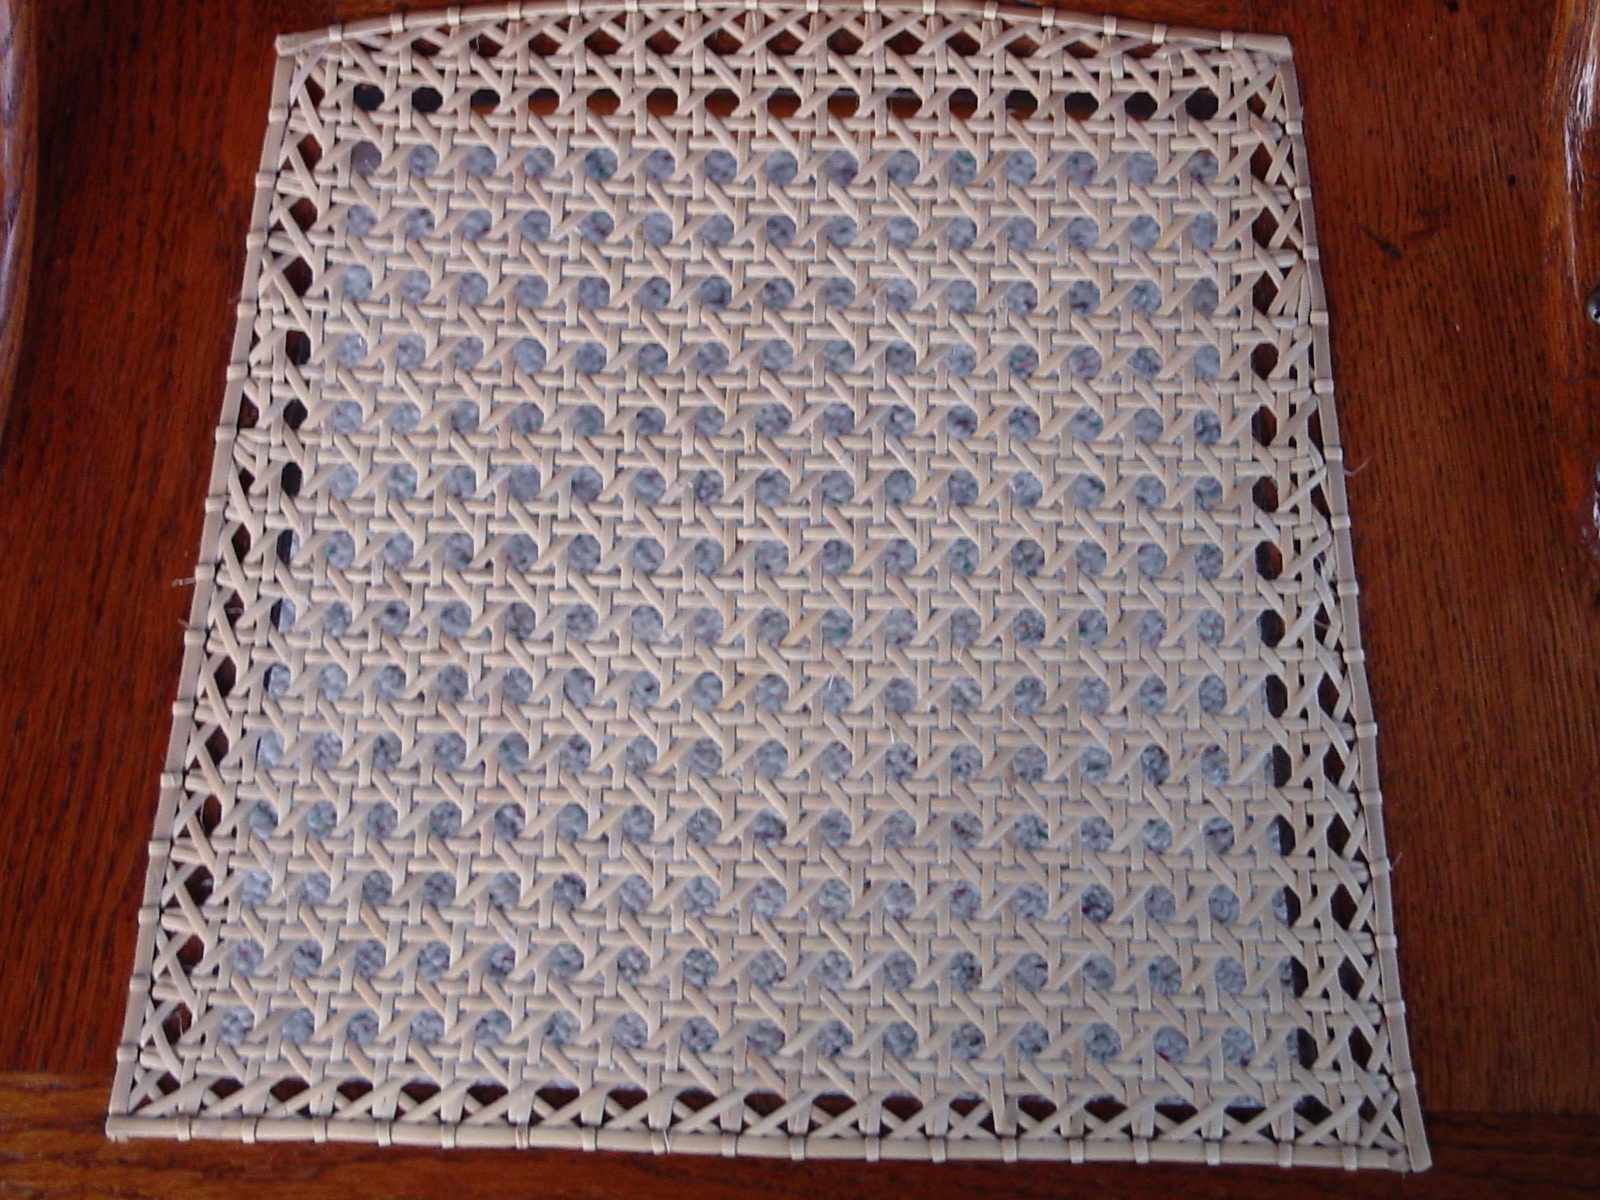
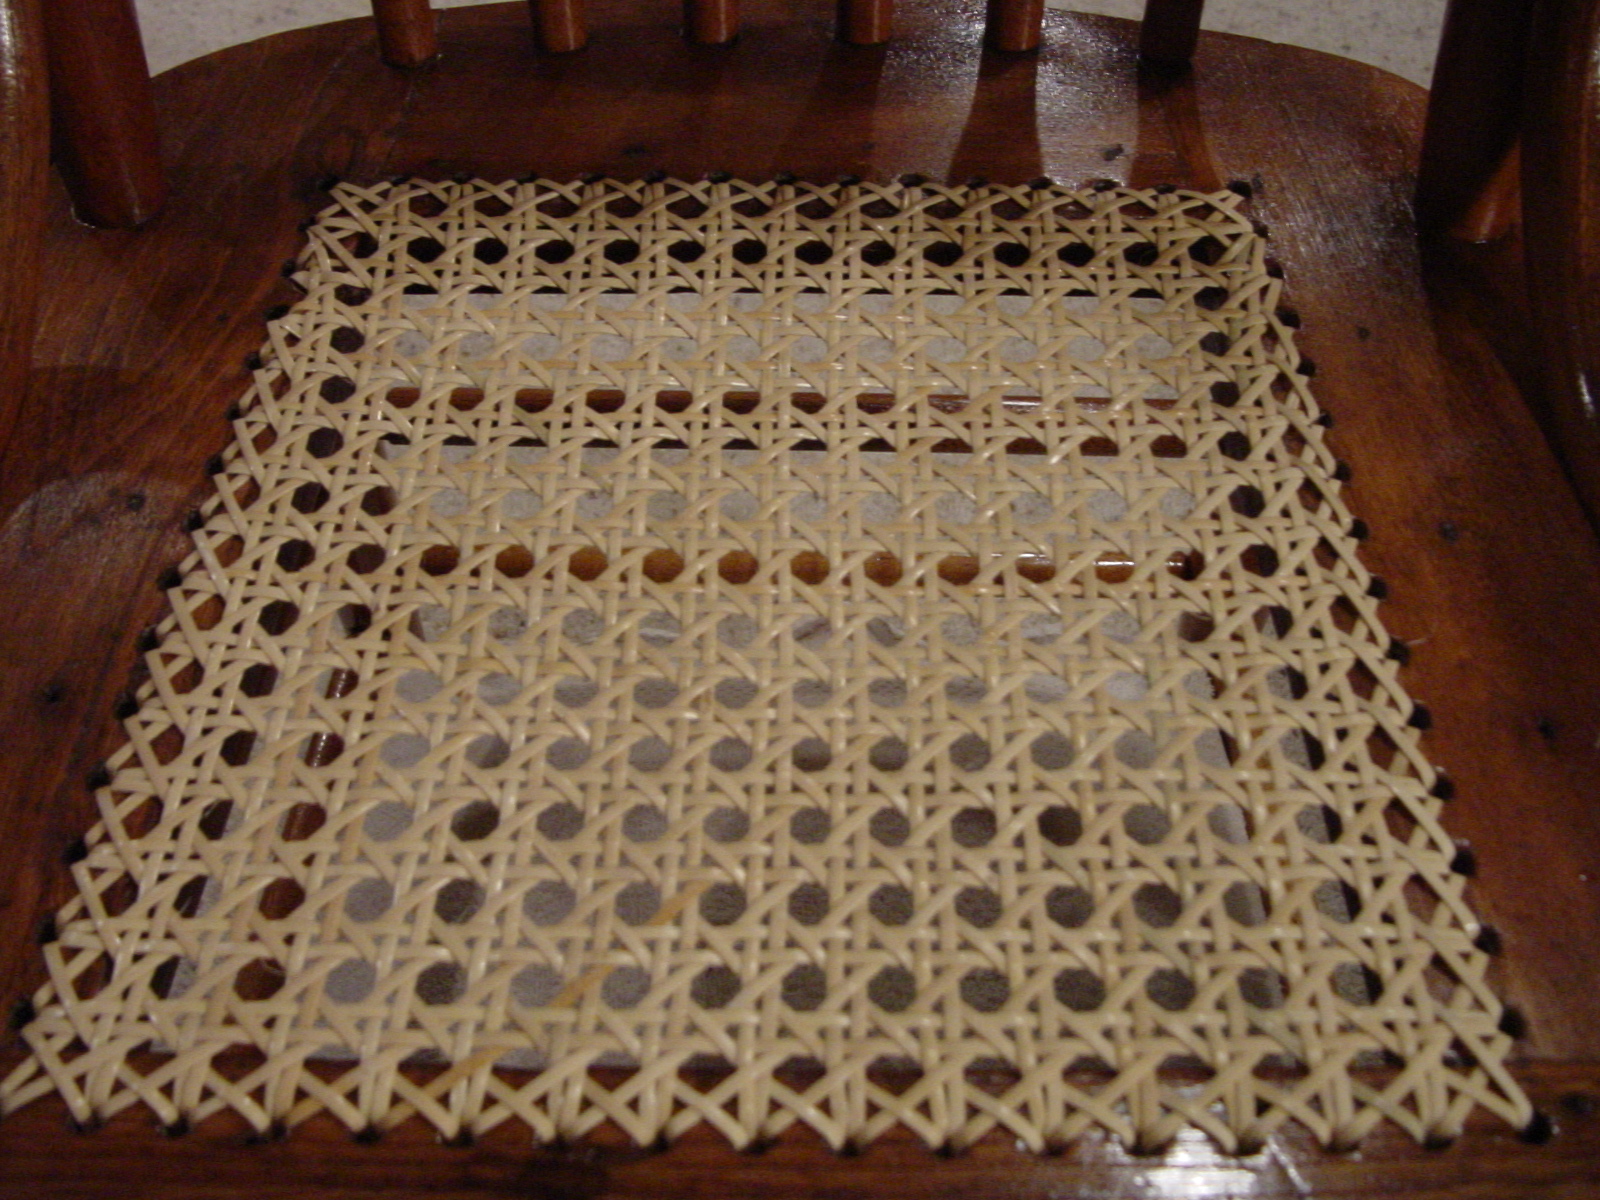
Here is the finished seat. Notice the "X" formed on each rail.
Celebrate the successful completion of another beautiful caning project.
These are now heirlooms that will be passed down, Grandma's chairs going to
Great-Granddaughter, who may be able to pass on to her child.
In addendum: One of the two chairs in this project had 60 holes, the other had 72. The smaller chair took me about 5 hours to complete. I was trying to see how fast I could complete this basic chair. The larger took a little over 6 hours.
Copyright 2005, All work on this page was completed by Wayne Sharp & may not be
used for profit without his written permission.